
Iconik Review Process
Iconik is the shared review tool for all image and video assets - on both boards. This page is specifically the NPI product-image review cycle on the Product Planning board: decisions here flip Monday subitem statuses. It is a different process from the MCR approval chain (which signs off creative deliverables) - even though that can also happen in Iconik.
You set your status - the board moves it through the chain
When your part is done, you don’t move the task to the next person or work out which review stage comes next - the board handles that. You set one status that records what you decided, and the board moves the work forward from there. Which status you set depends on whether you reviewed the work or made it:
Reviewers say
Approved- this passes my review; it moves on to the next reviewer.Revisions Needed- this needs changes; it goes back to whoever’s fixing it.For James Review- I’d rather James make this call; it goes to him instead.
Assignees say
Revisions Done- I’ve addressed the feedback; it goes back to the reviewer who flagged it.
The cycle at a glance
Section titled “The cycle at a glance”A review starts by itself when the work lands - uploading the asset is the “ready for review” signal. For each image subitem:
- The asset lands in Iconik; a share link pushes to Monday and the task enters its first review stage automatically. No one announces “ready for review.”
- The reviewer gives a green thumbs-up () per angle, then sets
Approved. The board immediately moves the task to the next reviewer in the chain. - For changes, the reviewer red-thumbs () the failing assets and sets
Revisions Needed. - After the last reviewer approves, the task rests at
Approvedand the automations unlock the next stage.
Re-pasting or refreshing a link on a task that is already mid-review, in revisions, or finished does nothing - completed work can’t be pulled back into review by a link update.
Who reviews what
Section titled “Who reviews what”Each task type has a fixed reviewer sequence. The reviewer just sets Approved;
the board advances the stage.
| Stage | Reviewer(s) | Checking |
|---|---|---|
| Concept image | Lead, otherwise Brand Manager † | creative concept & brand aesthetic |
| App shot | PMM → PM † | styled composite + product application |
| Originals | Product Manager | angle selection (RAW) |
| Versions | Brand Manager → Product Manager | brand compliance, then edited quality |
| Renders | PM → Brand Manager → PM | structural integrity, brand compliance, finish |
| PPID images | Product Manager | website tagging + order only |
† The Lead seat is optional, and concept images have a fallback. With a Lead
assigned, the Lead reviews first - the concept image goes to the Lead, and the app
shot takes a Lead pass before PMM. With no Lead (the usual case): the app shot goes
straight to PMM → PM; the concept image falls to the Brand Manager, unless the BM
is the task’s assignee (you don’t review your own work) or there’s no BM, in which
case it self-approves. A blank assignee defaults to BM Review.
Brand-compliance review (the Brand Manager pass) now happens earlier in the
chains - on versions, renders, and light_expression - rather than as a first
pass on the PPID images. By the time images reach PPID prep, brand compliance is
already signed off, so the PPID review is purely the PM’s tagging pass.
The full reviewer sequence for every task type is in the reference table below.
Two refinements worth knowing:
- Empty seats are skipped. If a SKU has no Lead assigned, the Lead stage is skipped and the work goes to the next reviewer. A chain where every seat is empty resolves immediately.
- Anyone can be sent a detour. Any reviewer, at any stage, can hand the task to
someone off the chain with a
For … Reviewlabel instead of approving.For James Reviewis the only one that can approve on the chain’s behalf; the rest send it back. See Sending it to someone off the chain.
Photography review
Section titled “Photography review”Photography assets have a RAW phase. The full step-by-step lives on Capture & PM selection:
photography_originals- PM selects which angles to edit (approve only chosen angles; default-reject the rest). Reshoot exception →Revisions Needed+/originals/_rejected.photography_versions- BM → PM chain: the Brand Manager clears brand compliance, then the PM reviews edited images and approves the angles to carry forward as PPID candidates. No rejections at this stage.
Renders review
Section titled “Renders review”Unlike photography, rendered (CG) images are already post-processed and have no
RAW phase. renders are the CG’d images.
PM review - angle selection
Section titled “PM review - angle selection”- The Product Manager ensures product structural integrity is correct.
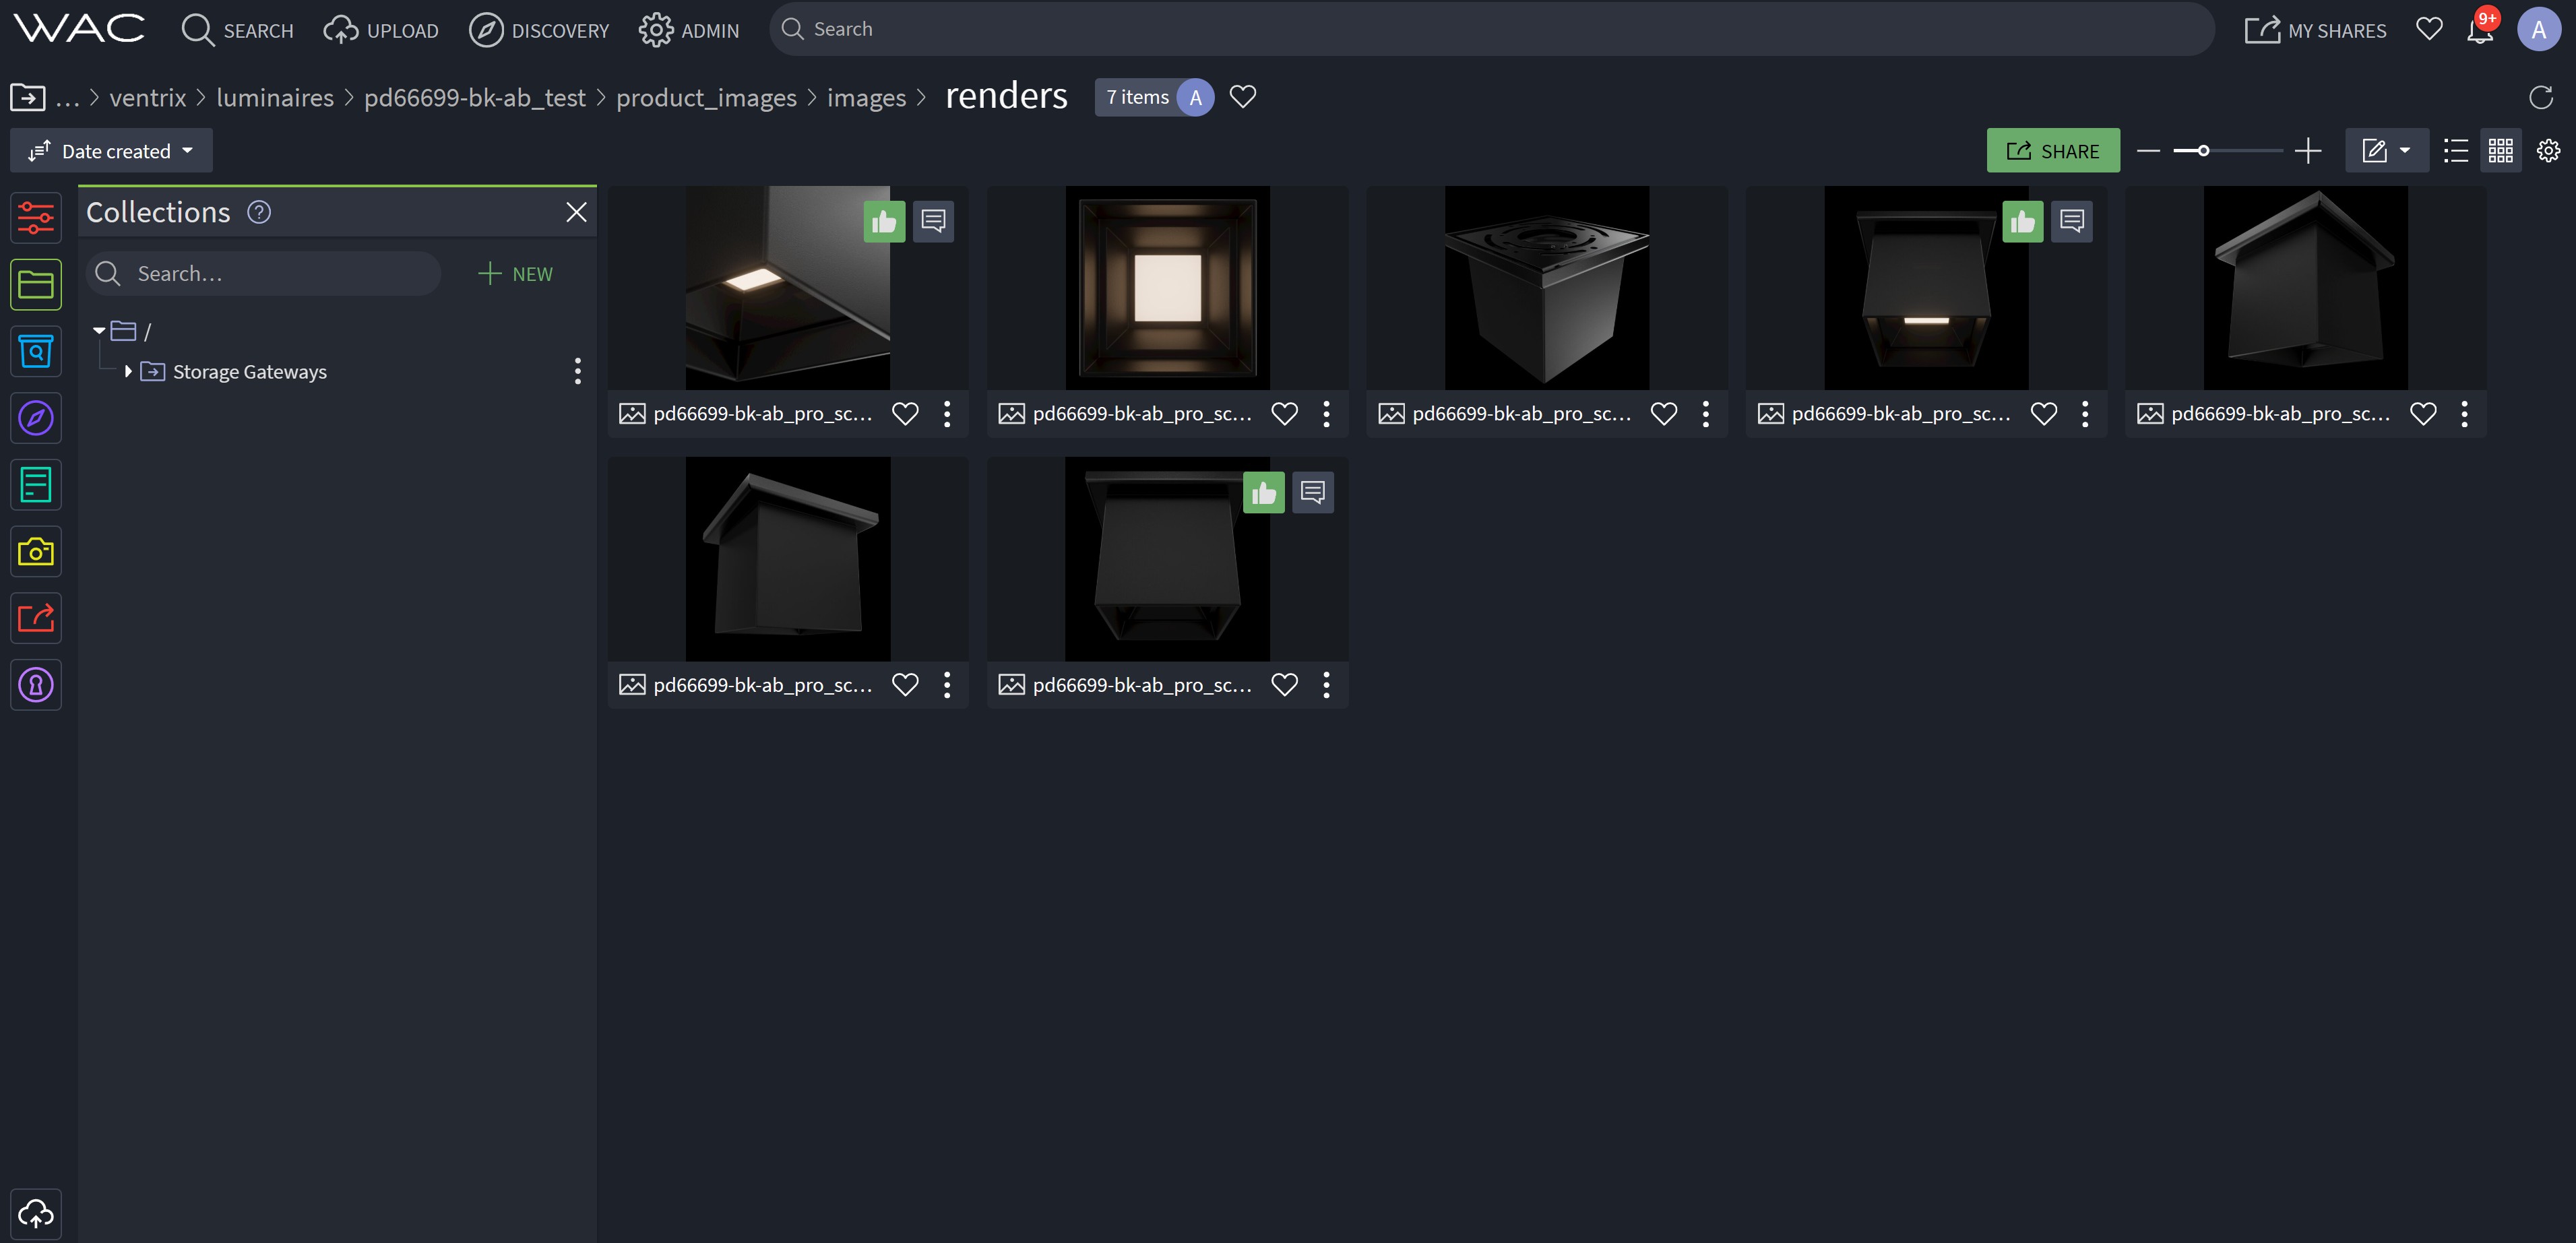
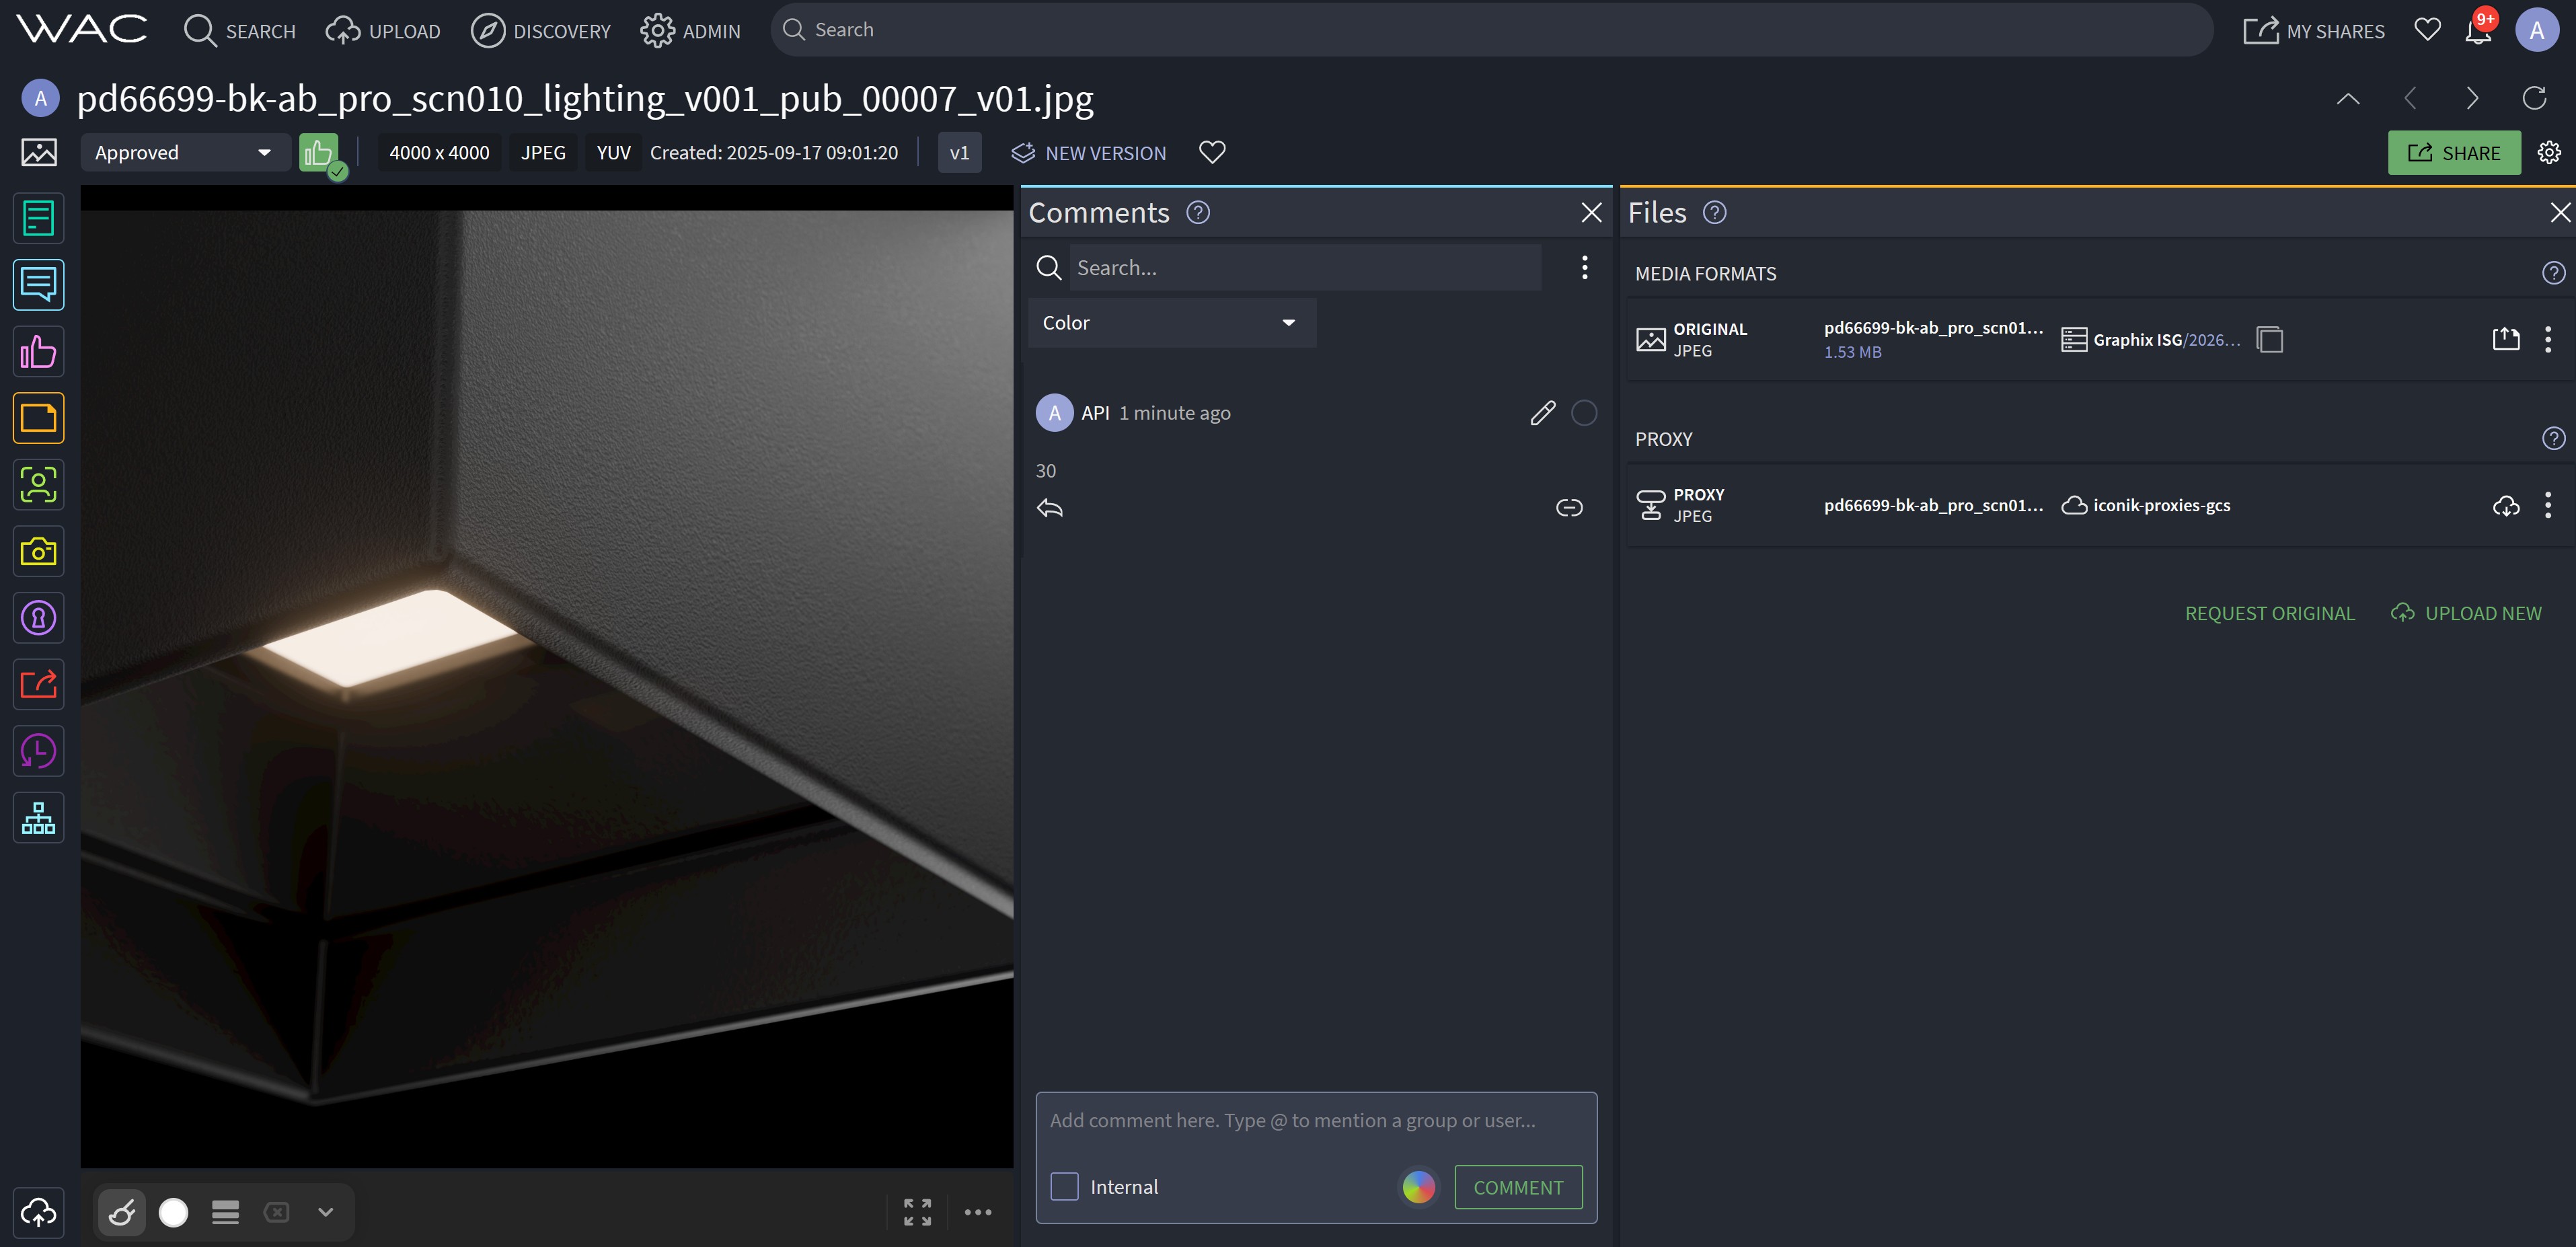
- Approve only suitable angles in Iconik with a green thumbs up - this identifies which angles should become PPID images.
- No website tagging or renaming happens at this stage.
When revisions are needed
Section titled “When revisions are needed”If revisions are needed due to incorrect STEP files or production parts not matching:
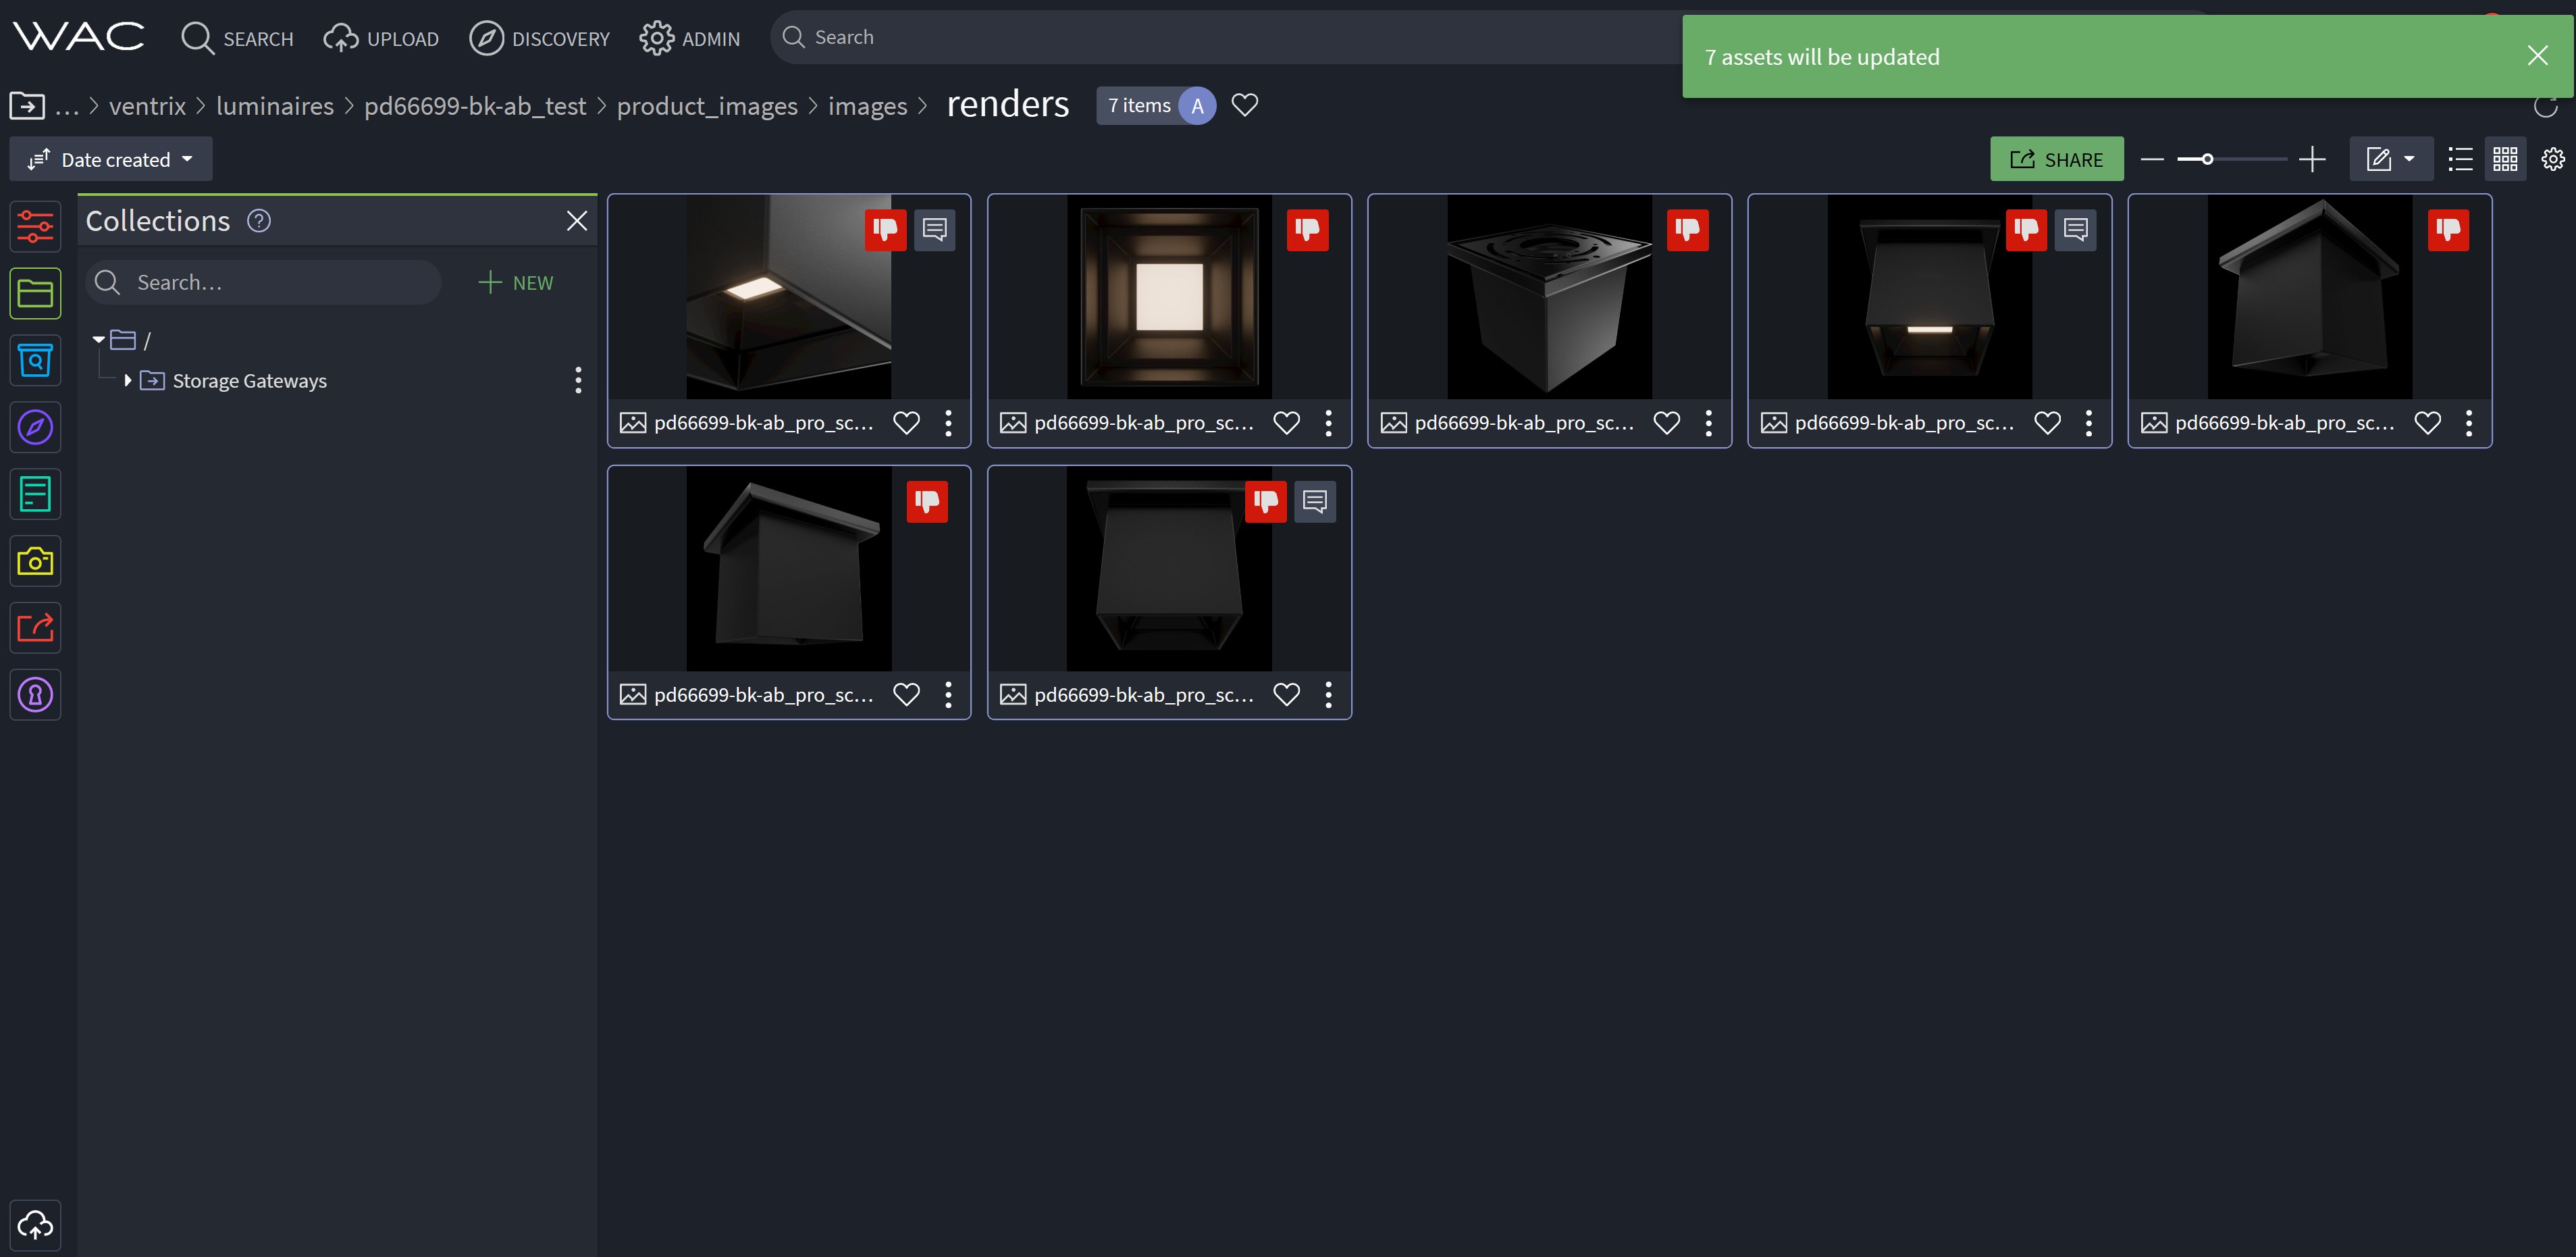
- Reject all images (red thumbs down).
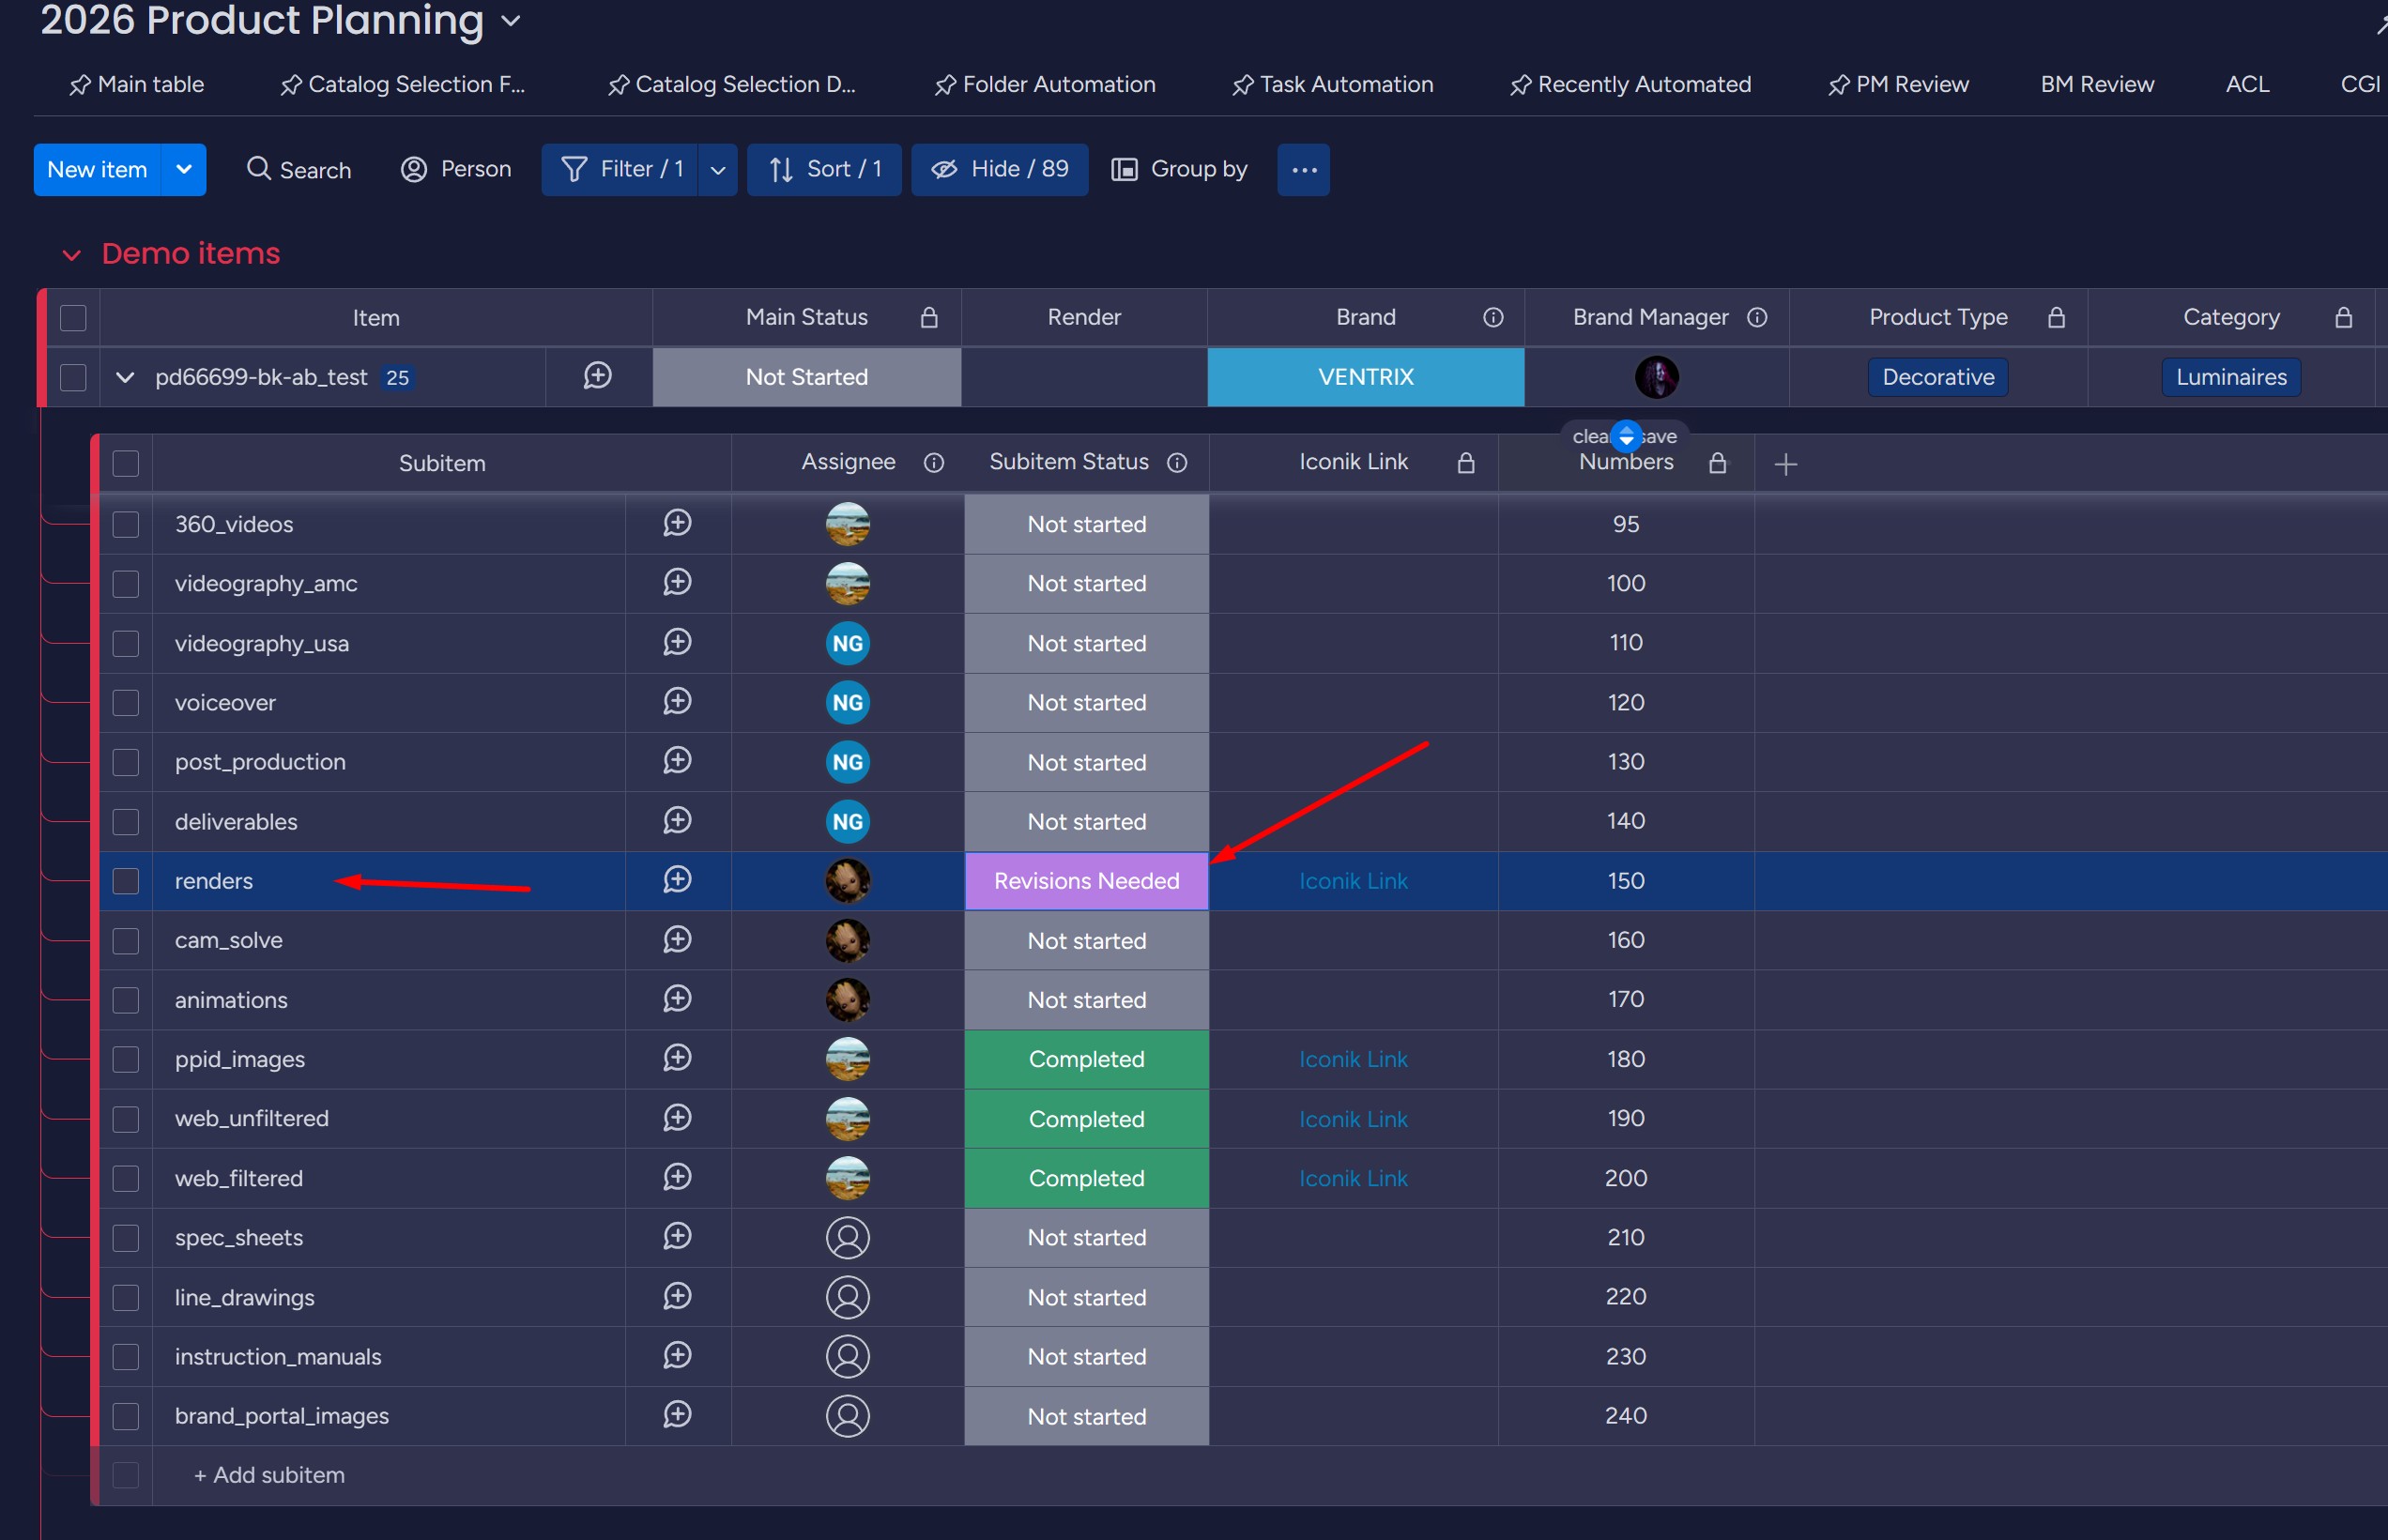
- Update the
renderssubitem status on Monday toRevisions Needed.
Once the artist re-uploads fixed files to the same task folder with the next version
suffix (_v02, _v03, …), the board brings the task back by itself: as soon as
every red-thumbed asset has a replacement, the subitem flips from Revisions Needed
straight back to the reviewer who rejected it. No one has to remember to restore the
status. (Shoot folders - photography_originals, videography - are the exception and
stay manual; see the revisions detail below.)
The PM reviews feedback related to structural integrity, finish accuracy, and
presentation. Write all notes/comments directly in Iconik; tag @Jude Li to
direct a revision to him (Monday and Iconik notify the team regardless).
- Cosmetic revisions are handled by Jude and team.
- Structural changes that require a new STEP file are handled by Alex and team.
Renders run a PM → Brand Manager → PM chain: each reviewer just sets Approved
when satisfied and the board advances the stage. Once angle selection is complete and
images are structurally correct, set Approved - the board moves it to the next
reviewer, or to the next production stage after the final pass.
PPID image review
Section titled “PPID image review”ppid_images are the final images used on the website. Only images with a green
thumbs up in photography_versions or renders are eligible to enter this stage.
When the ppid_images subitem is flipped to Ready to start, the assignee (Jude,
his team, or the designer) is notified automatically.
PPID review is the PM’s tagging pass only
Section titled “PPID review is the PM’s tagging pass only”PPID review has a single stage: the Product Manager. Brand compliance is no
longer checked here - the Brand Manager already signed it off upstream on
versions, renders, and light_expression. So by the time images reach PPID,
the PM’s only job is website tagging.
- Confirm the images have already passed Brand Manager review and brand compliance.
- Thumbnail tagging - use letter-based tags (
T,H,V,S,C). If the thumbnail is also the first website image, assign the lowest number starting at1(e.g.T 1, orT S 1if the same image is also a spec + thumbnail). - Image-order tagging - assign numerical tags to define website order
(
1,2,3, …; 2-digit format where applicable). - Update the
ppid_imagessubitem status toApproved. This confirms the image selection and ordering are finalized, and automatically wakes the web-export tasks - see PPID & web export.
See the naming conventions for the full PPID type- code and order-token table, and PPID & web export for how approved images are published to the website.
What happens on a rejection
Section titled “What happens on a rejection”The rejection loop is a closed circuit for versioned deliverables:
- Reviewer rejects. Red-thumb () each failing asset in Iconik and set the
subitem to
Revisions Neededon Monday. The thumbs are what the automation counts; the status is the gate. Do both. - Artist fixes and re-uploads. Replacement files go into the same task folder
with the next version suffix (
_v02,_v03, …). - The board returns the work by itself. Once every rejected asset has a
replacement, the subitem flips from
Revisions Neededstraight back to the reviewer who rejected it.
What makes it safe:
- Replacing one of three rejected assets does nothing yet - the task returns only when all three are replaced.
- Green-thumbing or deleting a previously rejected asset removes it from the outstanding list; if it was the last one, the task returns to review.
- A late sendback (rejecting work that already finished its cycle) returns to the final reviewer of the chain, not the first.
- The automation only restores a task still sitting at
Revisions Needed. If a human already moved it, the automation stays out of the way.
Shoot folders need a manual trigger. photography_originals, videography_amc,
and videography_usa are camera dumps with no version suffix for the automation
above to match a “replacement” by. Once the reshoot is uploaded, the assignee
(not the reviewer) sets the subitem status to Revisions Done. The board reads the
reviewer stage that was pending when Revisions Needed was set and restores it
automatically.
Revisions Done: let the board pick the reviewer
Section titled “Revisions Done: let the board pick the reviewer”Every reviewed subitem accepts a fourth human-set status: Revisions Done. When the
assignee finishes addressing feedback, they set this - the board restores whichever
reviewer stage was pending (Lead, PMM, PM, or BM) from the same chain position that
was frozen when Revisions Needed was set. This works on every task type, including
the shoot-folder exceptions above, and alongside the automatic replacement-matching
for versioned deliverables.
Only the assignee sets Revisions Done. PM, BM, Lead, etc. never touch it - it’s
not a review decision, it’s “I’m done fixing this.” If a task-doer instead guesses
and sets a reviewer’s own stage label directly (PM Review, BM Review, …), the
automation has nothing to act on: the hand-off can silently stall or skip the
intended reviewer.
Sending it to someone off the chain
Section titled “Sending it to someone off the chain”The board remembers one thing: which reviewer seat is waiting. Only an Approved
set from that seat moves the memory forward, and Revisions Done always hands the task
back to it.
Every For … Review label is a detour. The board parks the task there without
moving the memory - so a detour ends back at the seat that was waiting, and nobody
loses their turn.
flowchart TB
  A(["BM Review<br/>the waiting seat"])
  B["a For … Review label<br/>Jude · James · Noah · Cathy"]
  C(["PM Review<br/>next seat"])
  D["Revisions Needed"]
  E["Revisions Done"]
  F(["BM Review<br/>same seat, still waiting"])

  A -- "anyone sets it · always by hand" --> B
  B -- "James only: Approved" --> C
  B -- "everyone else: sends it back" --> D
  D -- "team fixes it · assignee sets" --> E
  E -- "board restores the seat" --> F
Nothing puts a task on a detour except a person. The arrow into the detour is
always manual, every time - so if the detour reviewer wants a second look after the
fix, set their label again. Revisions Done will not do it for you; it goes to the
waiting seat.
For James Review is the one detour the board knows. James’s Approved counts for
the seat that deferred to him and the chain advances to the next seat - it does not
bounce back.
Every other detour has no Approved. For Jude Review, For Noah Review and
For Cathy Review are invisible to the automation. The detour reviewer sets
Revisions Needed to send work back, and that is their only status move; when they’re
satisfied, the assignee sets Revisions Done and the waiting seat signs off for real.
Setting Approved from one of these labels reads as a review the board can’t place:
downstream work unlocks, and the task moves on past the seat that never signed off.
Reviewer sequence by task
Section titled “Reviewer sequence by task”The plain-language summary is in Who reviews what; this is the
full sequence for every reviewed task. The reviewer sets Approved at each stage and
the board advances to the next.
| Task | Review sequence | After the last approval |
|---|---|---|
concept_image | Lead, or BM if no Lead | Completed |
app_shot | Lead → PMM → PM | Approved |
photography_originals | PM | Approved |
photography_versions | BM → PM | Approved |
videography_amc / videography_usa | PM | Approved |
renders | PM → BM → PM | Approved |
light_expression | BM → PM | Approved |
cam_solve | BM | Completed |
ppid_images | PM | Approved, then auto-Completed once both web exports land |
web_unfiltered / web_filtered | no review | Completed the moment the link lands |
The sequence shows the full reviewer order. The board reviews only the seats
assigned on that SKU and skips the rest, keeping the same order - so a chain can be
shorter than shown, and a chain with every seat empty resolves on its own. The
concept_image and app_shot rows ship as app shots; see
App shots & PPID images.
Troubleshooting
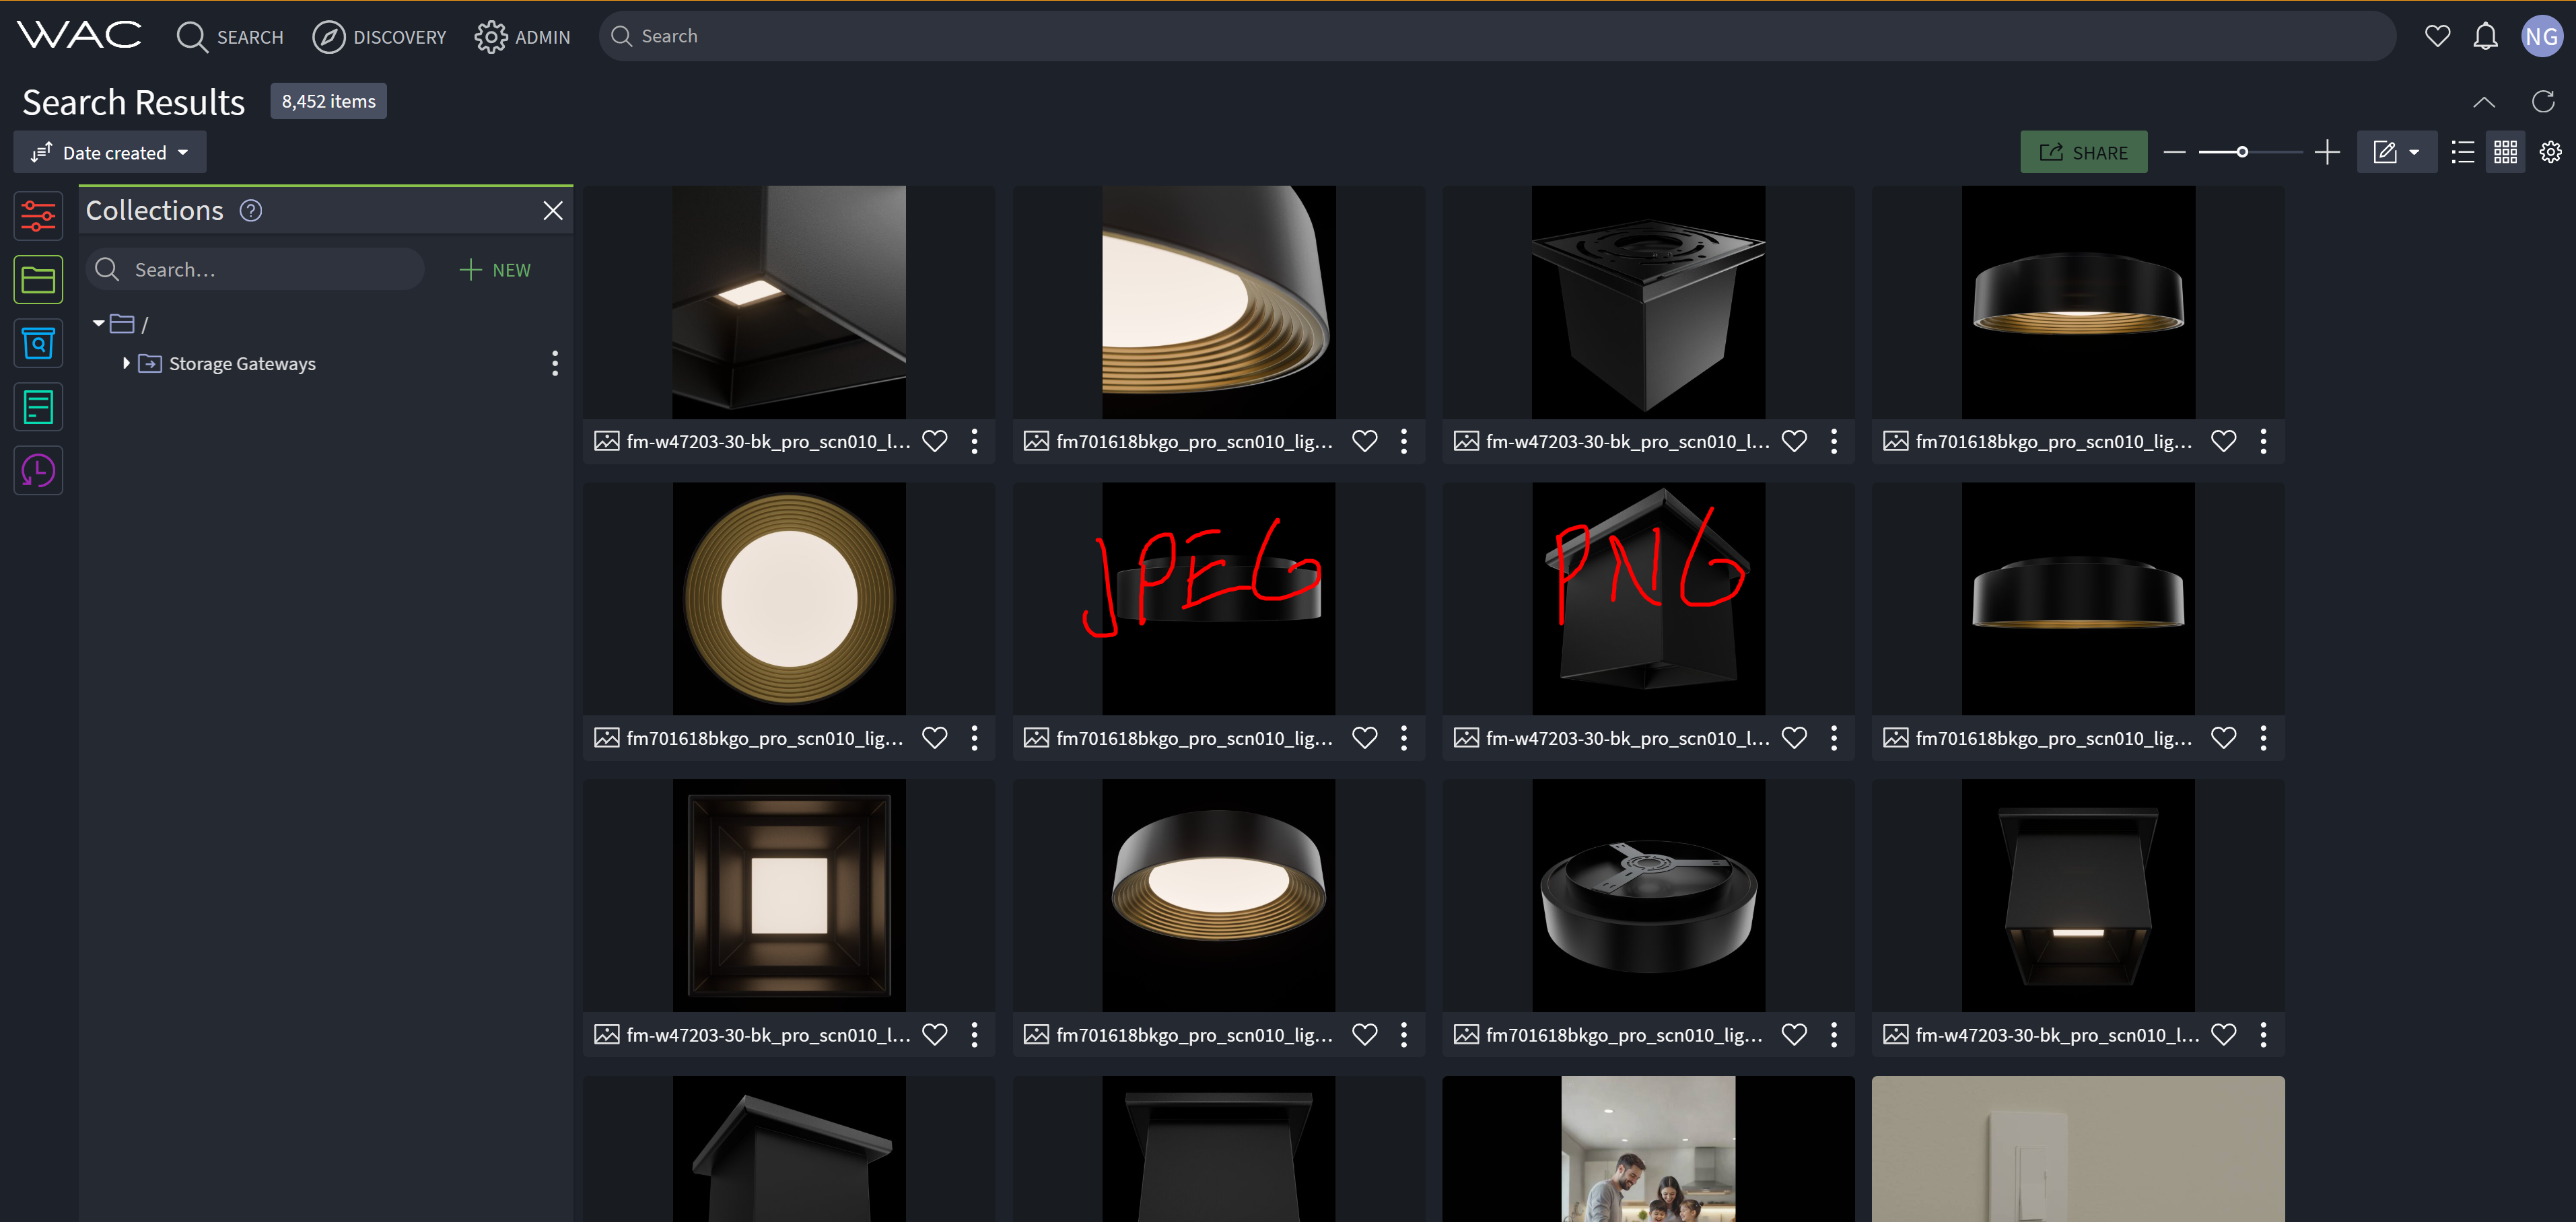
Section titled “Troubleshooting”Assets will occasionally fail to transcode in Iconik. A failed item is missing its
thumbnail preview and instead shows just the file extension (JPEG, PNG, MOV,
MP4, etc.).
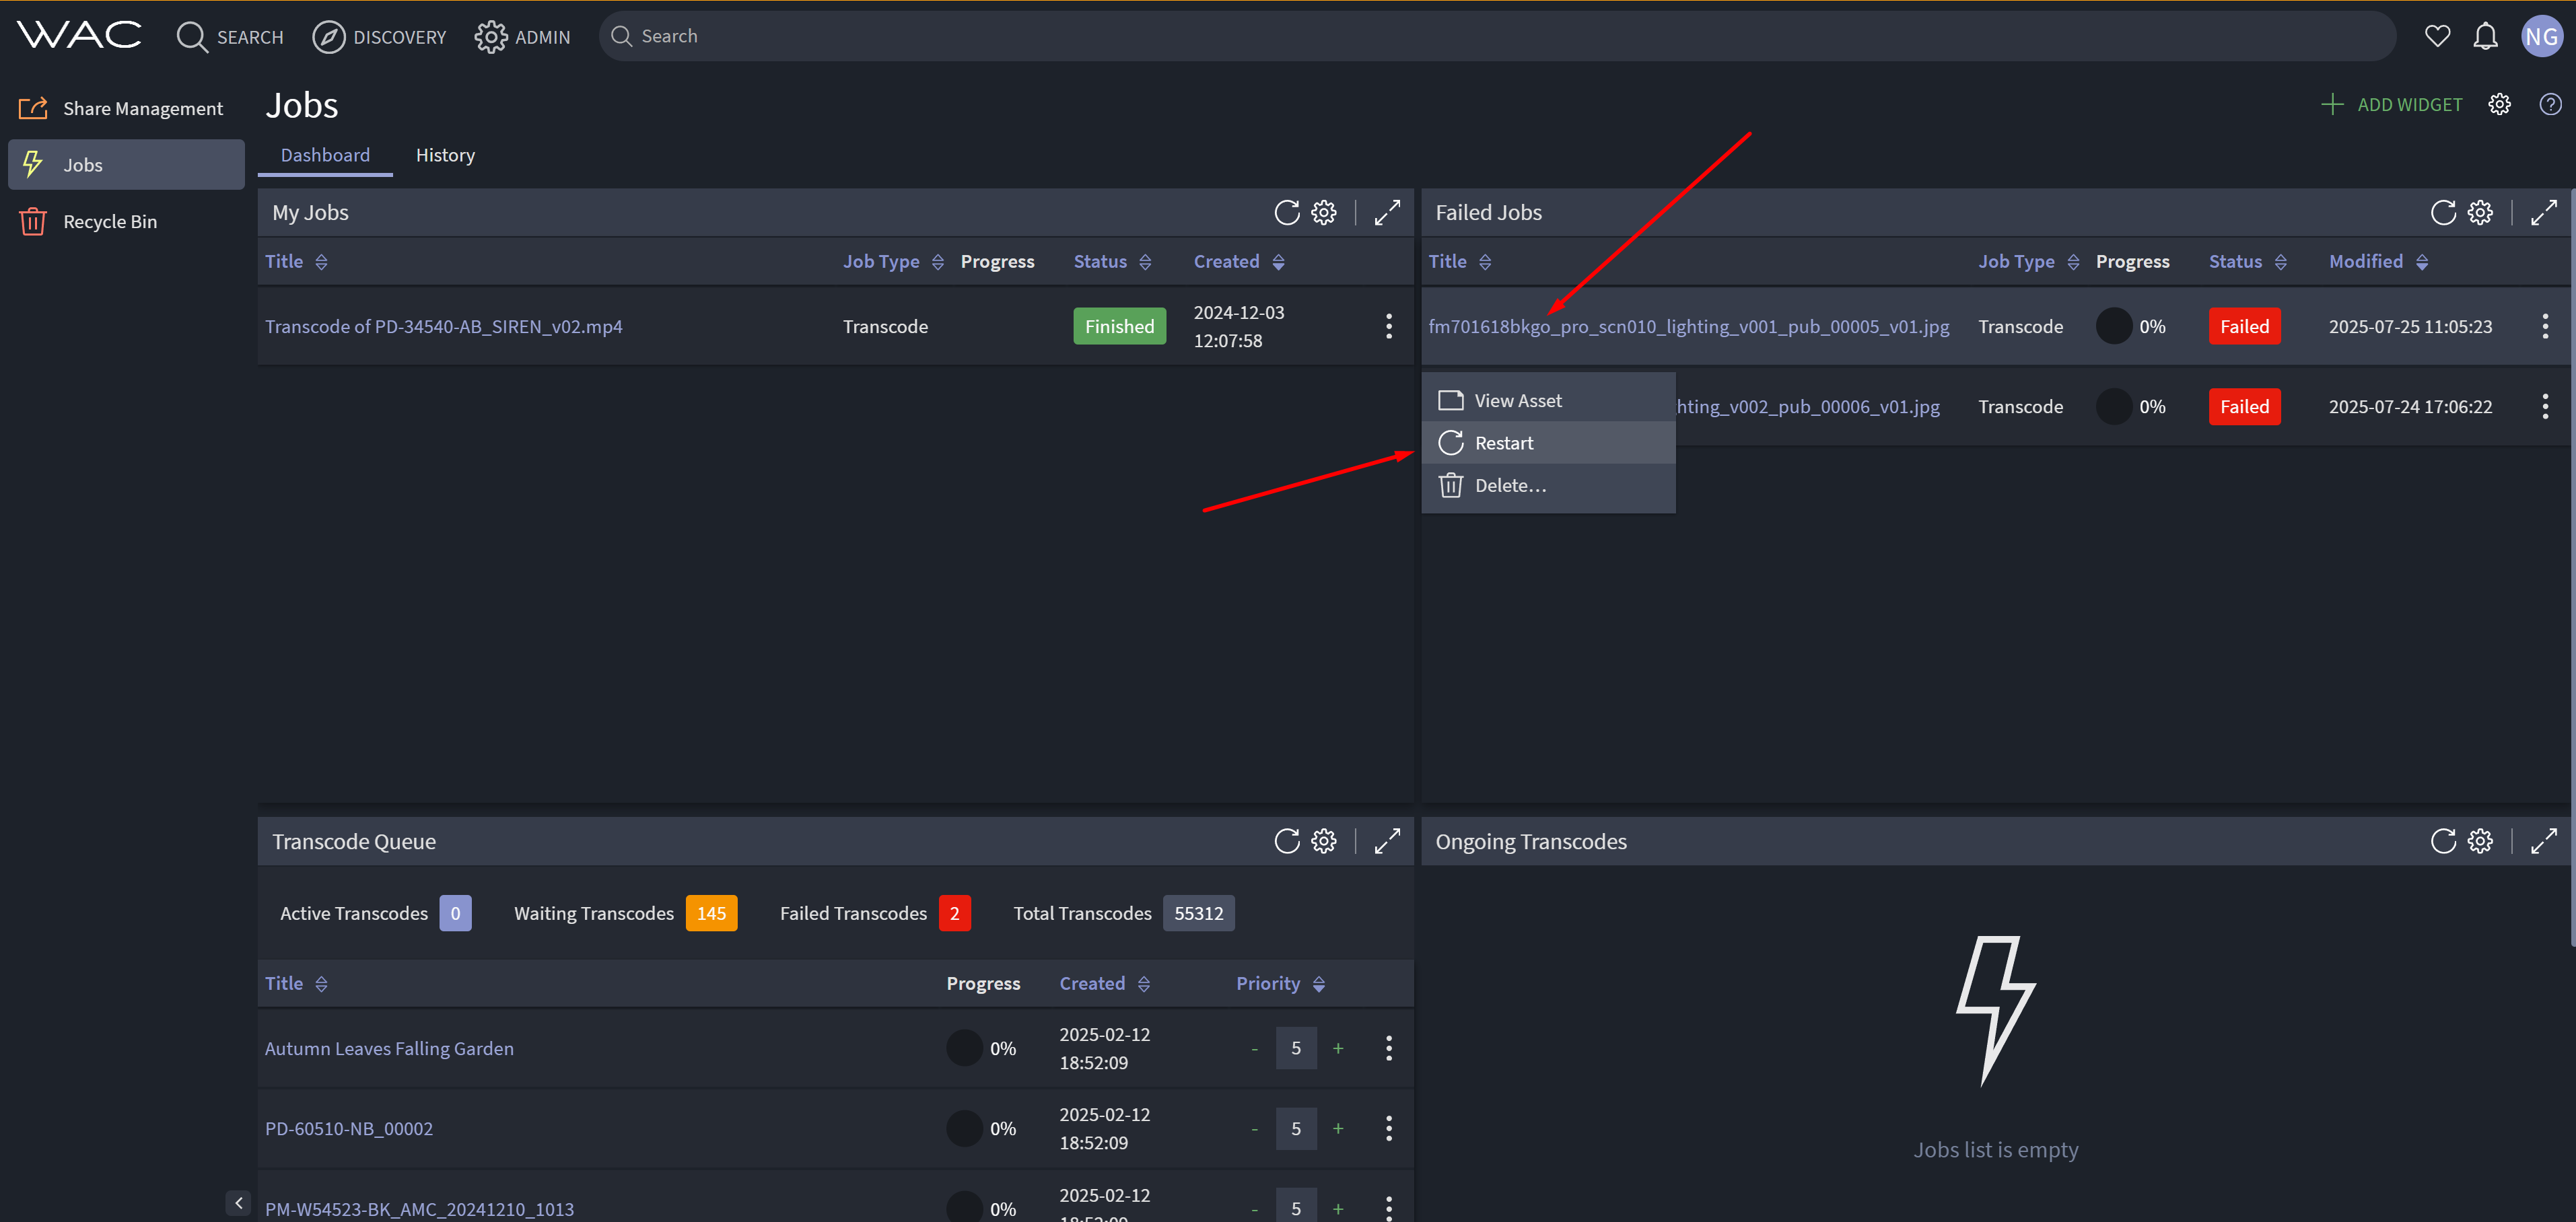
The most straightforward fix is to re-transcode the failed item, which resolves the vast majority of cases.
-
Log in to Iconik and click Admin (locate Failed Jobs on the right).
-
Locate the failed item(s) and select the option to re-transcode them.
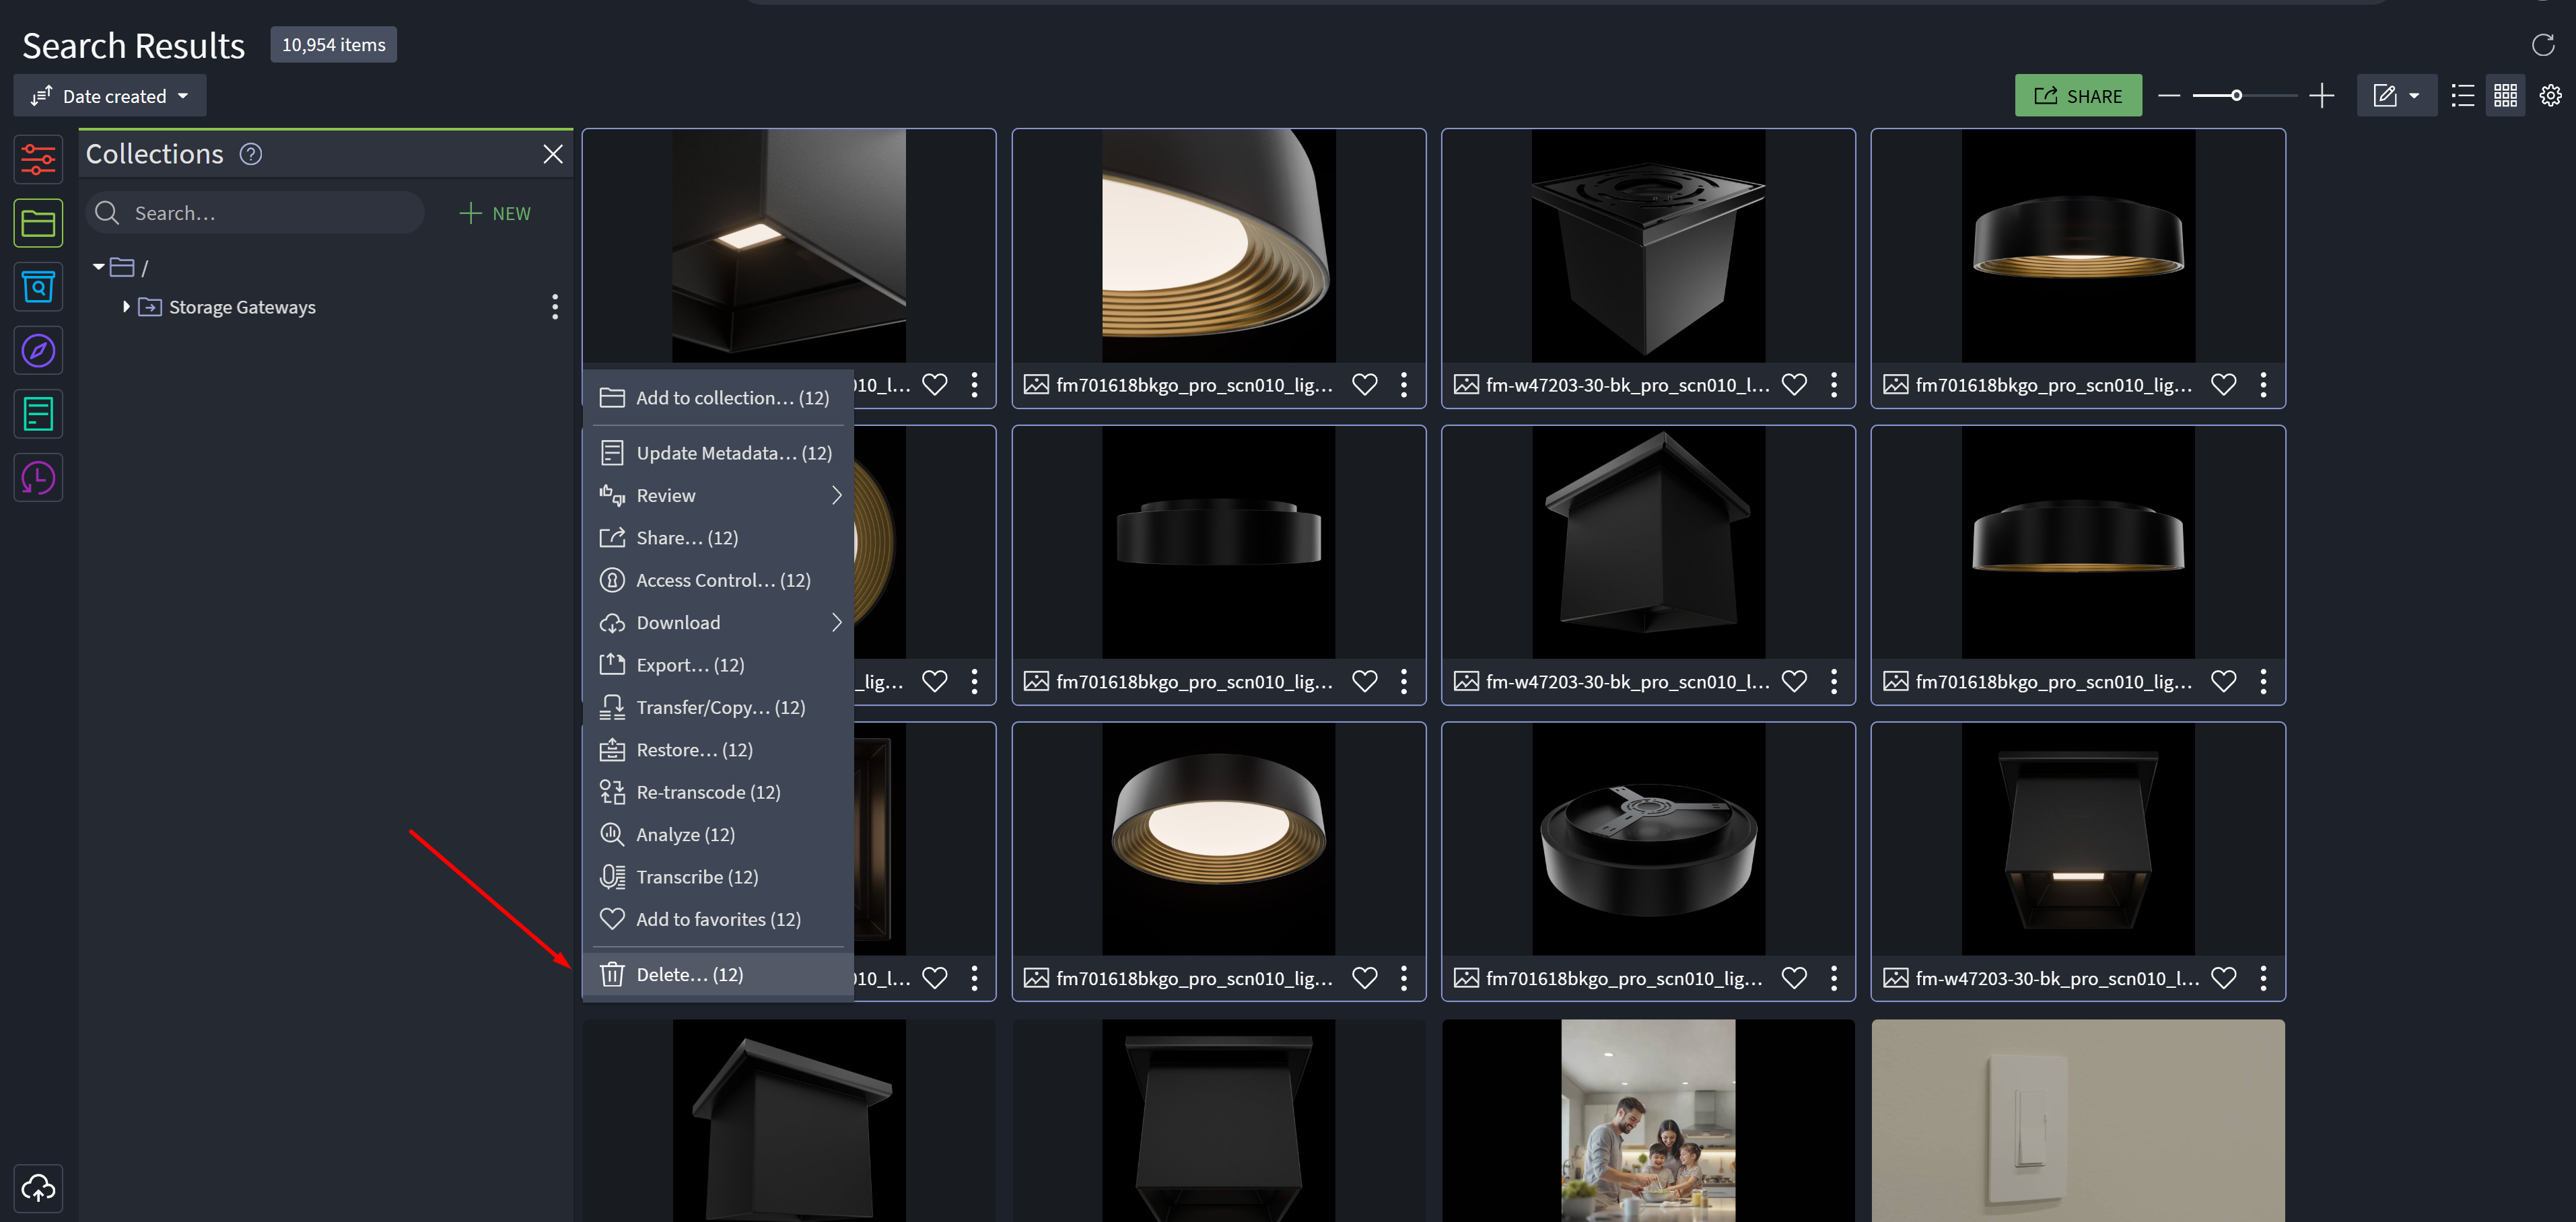
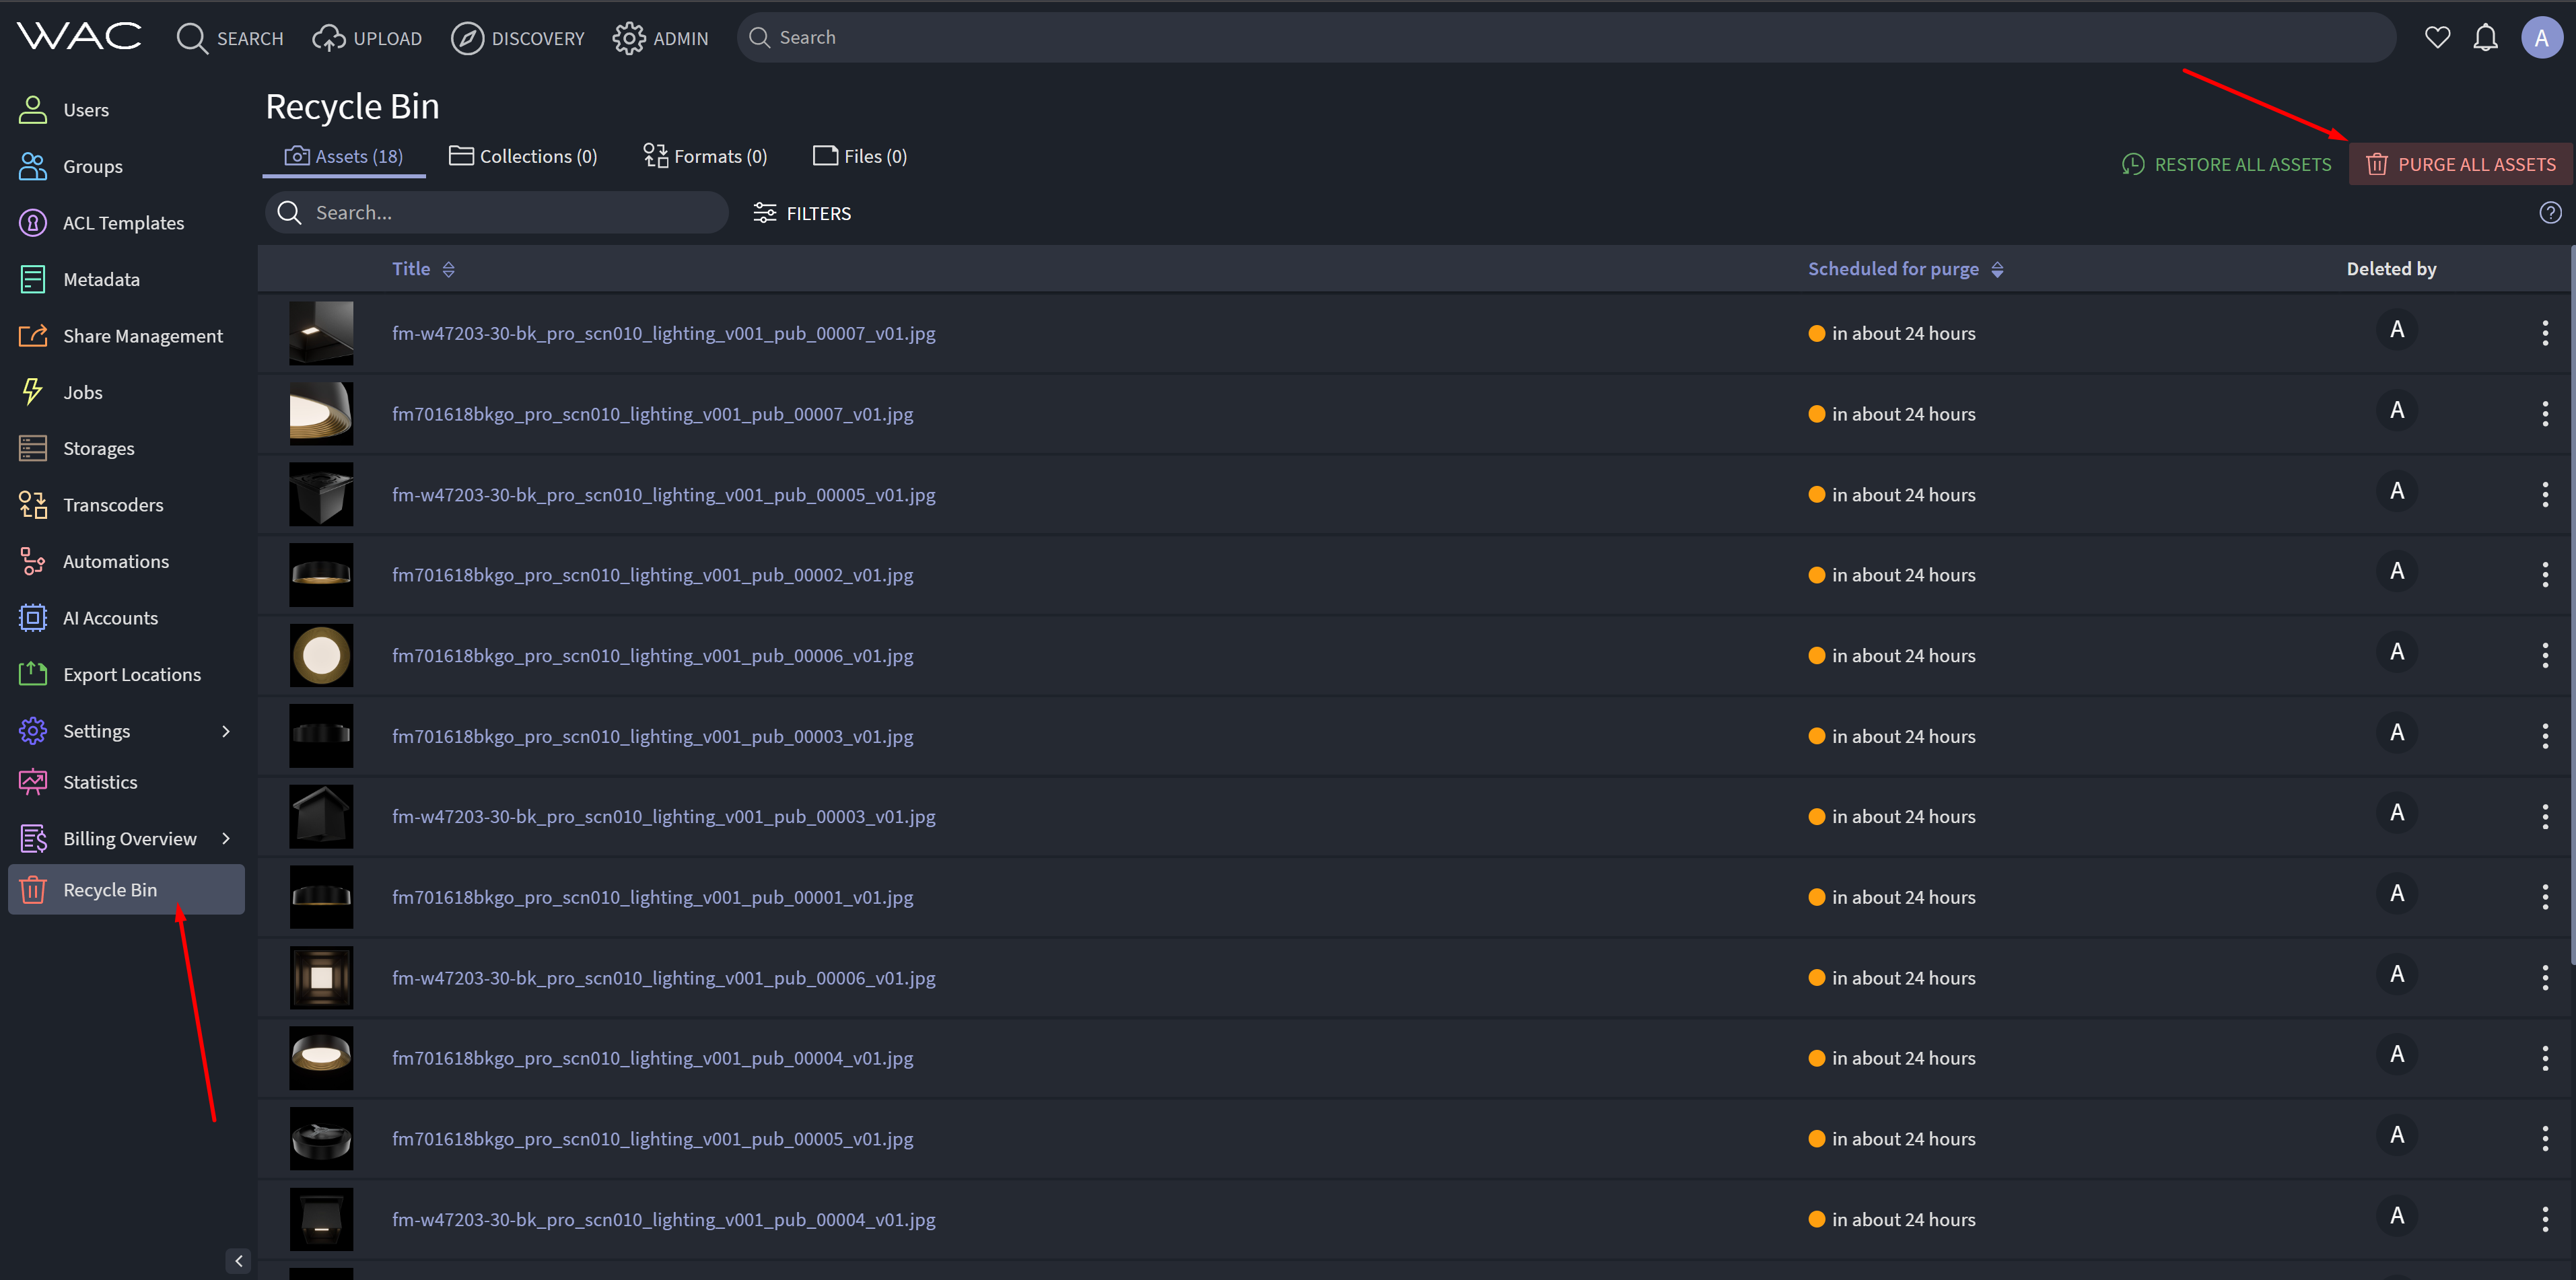
If re-transcoding does not fix the asset, delete it from Iconik and then purge the Recycle Bin. The purge step is essential: it lets Iconik process the asset fresh from the beginning.
-
Select the asset(s) to delete, right-click, choose Delete, and confirm.
-
Click Admin : Recycle Bin : Purge All Assets.
If the asset still fails after a purge and re-transcode, the file is likely corrupt and must be re-exported from the source application (Premiere Pro, After Effects, Photoshop, etc.).